May 11, 2016
Professional Project Review
The professional project I reviewed this time was an animation called "The Colors of Evil." It was an animation mainly about a girl that was bullying another girl, and justice was served in the end with the help of a demonic presence.
The animation was very well done and included some really good detail. For example, the hair is textured to match the lights in the setting. Everything else including the demon especially has very good detail.
One element I would apply to my work is the use of strong, bright colors. This animation has very vivid colors and it looks very nice. I already know how to do this but I haven't applied this to any projects yet.
The creator did many things well, like making the characters look very good. They were colorful and full of detail. One thing he didn't do very well however is add enough detail to the background. I think this was a very good animation, I would be very proud of it if it was my own work.

Mar 11, 2016
Technical Tutorial
Hello, today I am going to show you how to make a motion path and attach a camera to it for animation purposes in Autodesk Maya.
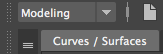
First, make sure you are in modeling and on the Curves / Surfaces tab. This tab holds everything you need for making a motion path.
Now, select your shape and scale it to the desired size.
I went with a circle. I then scaled it to the desired size

Now, go to the Rendering tab and select the Camera
Now drag your mouse over both objects, selecting both.

Next, go from Rendering to Animation. Then at the top, select Constrain>Motion Path>Attach to motion path

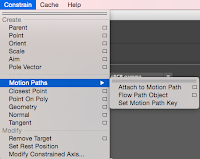
Now, your camera is attached and you can continue with Animating!
First, make sure you are in modeling and on the Curves / Surfaces tab. This tab holds everything you need for making a motion path.
Now, select your shape and scale it to the desired size.
 |
| This is all the tools you can use to make a motion path |
I went with a circle. I then scaled it to the desired size

Now, go to the Rendering tab and select the Camera
 |
| It is the one with the camera on the grid |
Now drag your mouse over both objects, selecting both.

Next, go from Rendering to Animation. Then at the top, select Constrain>Motion Path>Attach to motion path

Now, your camera is attached and you can continue with Animating!
Feb 24, 2016
Personal Blog Post
This is my personal, animated logo. We had to design a logo in Adobe Illustrator, save it so it could go into Maya correctly, then Animate it. It was a fairly easy project. I spent the majority of my time designing my logo and getting the right colors I wanted. I learned in Maya how to:
- Apply a camera to a motion path
- How to make a motion path
- How to render out using the attached camera
- How to open an Adobe Illustrator file in Maya correctly
- How to change the direction and path of a camera in the graph editor
 |
| Final product after designing and animating |
If I do something like this again, I will definitely use the motion path and camera. I found it to be really easy and simple to attach a camera to a simple motion path. I put the logo in a box so I could get rid of the black background and shift the viewers attention to be solely on the logo.
This was a very fun project, and I learned tremendously about different techniques.
Dec 16, 2015
Video Final
Our semester final for convergence journalism was a full news package that we made entirely. We all had specific stories, mine was about an underclassmen play. I got my partner, made a story and submitted it for the final. The final news presentation was relatively easy as all I had to do was submit my story and operate the camera. Every little job had someone that was in charge of it and I feel like our news show went pretty well. I really liked working in this group setting as there was tons of collaboration and feeding off of other peoples' ideas. Our group cooperated pretty well, which was good because we were all in the same finals-mindset. We definitely worked well together. There was some confusion on what exactly to do though, as we didn't have much help from teachers. If I were to assign this project to students, I would assign it much earlier than when we got it. Our group was kinda stressed out with thinking about upcoming deadlines. Heck, even some of our final news stories weren't done on the day of filming. This would've been avoided if we would have gotten the project even a week earlier. I learned a lot more about news rooms and their equipment, and what the people go through to push out these news packages. I have developed a new found respect for all of those associated with convergence journalism, mainly our school's news team.I didn't learn very much more software skills though, as I am fairly familiar with all the programs we used. If I do something like this again, I will definitely manage my time better as something I lacked was time. I hope to learn more about the behind-the-scenes of news and what makes a successful news story.
Dec 15, 2015
Technical Tutorial
I am going to teach how to use the EP Curve tool in maya to make a cup. First, to make it easier, you should start working in side view. Then, select the curve tool and start on the Y line. Make your base however big you want.


Then, proceed to make your base. this can be whatever shape you want.

Now, drag your curve up and make the rest of your cup in any desired shape. Remember to end your line on the same Y line you started on.

Then, use the revolve button to revolve the rest of your cup, to make an actual cup.

And now you have your cup! (I made my base too big.) You can now add some background with whatever you want.
Dec 9, 2015
Story Animation
Our most recent animation project was a story. We had to write up a storyboard, design characters, and animate it all out using mainly photoshop and after effects. 


Here is two of my storyboards i used as a guide while animating. I did however choose to leave a few scenes out due to deadlines. My main focus on this project was to animate a man following love around the country, all to get heartbroken in the end.

Here is what i drew out the characters as. I took these into photoshop, pieced their bodies together, and the animated them out in after effects. The animation was pretty easy, all I mainly had was walk cycles with different backgrounds pieced into multiple compositions.
Nov 30, 2015
Blood Drive Reviews
Evan
Positive: He had great voice-overs
Constructive: The volume was sometimes too low
Nick
Positive: Great B-Roll and interviews
Constructive: His voice-overs were too quiet
Allison
Positive: Good voice-overs
Constructive: The B-Roll was too loud
Courtney
P: Great voice-overs
C: Nat Noise was too loud at times
Dema
P: Good shot variety
C: Interviews were Quiet
Chelsea
P: Great voice-overs and interviews
C: Nat noise was sometimes too loud
Rosie
P: Good variety of shots
C: B-Roll was shaky
Kierstyn
P: Good J and L edits
C: Voice overs were boring
Rylee
P: Good overall volume
C: Interview's seemed boring
Cathrien
P: Good interviews
C: Boring voice-overs
Alex
P: Great B-Roll
C: Quiet voice-overs
Mitch
P: Great interviews
C: Nat noise sometimes masked voice-overs
Nicole
P: Good Interviews
C: Blurred b-roll
Drew
P: Good voice-overs
C: Loud b-roll nat noise
Emily
P: Great B-roll
C: Quiet interviews
Conlin
P: Good interviews
C: Boring voice-overs
Cyle
P: Good voice-overs
C: Quiet interviews
Jacob
P: Good interviews
C: Voice-overs were too long
Abbey
P: Good voice-overs
C: Nat noise was too loud
Amy
P: Great voice-overs
C: Some intewrviews were quiet
Alyssa
P: Good voice-overs
C: Nat noise was too loud at points
C: Interview's seemed boring
Cathrien
P: Good interviews
C: Boring voice-overs
Alex
P: Great B-Roll
C: Quiet voice-overs
Mitch
P: Great interviews
C: Nat noise sometimes masked voice-overs
Nicole
P: Good Interviews
C: Blurred b-roll
Drew
P: Good voice-overs
C: Loud b-roll nat noise
Emily
P: Great B-roll
C: Quiet interviews
Conlin
P: Good interviews
C: Boring voice-overs
Cyle
P: Good voice-overs
C: Quiet interviews
Jacob
P: Good interviews
C: Voice-overs were too long
Abbey
P: Good voice-overs
C: Nat noise was too loud
Amy
P: Great voice-overs
C: Some intewrviews were quiet
Alyssa
P: Good voice-overs
C: Nat noise was too loud at points
Oct 2, 2015
Vultures or Reporters? (video)
This article was comparing reporters to vultures. These reporters are people who immediatly reacted to the thursday shooting in Oregon by requesting interviews. The author was comparing reporters to vultures, as the reporters immediately requested interviews after a tragic event. He uses the reporters tweets to victims as evidence. The author was good at citing evidence especially tweets, but i feel like he dragged the article on longer than it needed to be. The authors evidence does indeed support the main ideas of the article though, the evidence is also clear and convincing.
Here is the article https://www.washingtonpost.com/lifestyle/style/vultures-or-reporters-after-shooting-witnesses-hit-with-media-requests/2015/10/01/c7c53a86-6871-11e5-9ef3-fde182507eac_story.html
Here is the article https://www.washingtonpost.com/lifestyle/style/vultures-or-reporters-after-shooting-witnesses-hit-with-media-requests/2015/10/01/c7c53a86-6871-11e5-9ef3-fde182507eac_story.html
Sep 30, 2015
Professional Project Review
1.) This animation is a short film uploaded to youtube, and it is about a man struggling to survive in the city.
2.) You can tell that most of the animations are drawings, especially when there is a close up or when the character is moving, and the animator made that style of animation look very well, and it fit the overall story well.
3.) The story was about a struggling man fighting his inner demons and other people, it all takes place in parts of a city and the mans mind.
4.) I would consider animating in that sam style he did, to get that drawing-look.
5.) I've already learned about character and story development.
6.) He drew the scene's and characters well and also had very good running/walking scenes.
7.) There could be better voice acting as at some points it didn't sound very good.
8.) The animator did very well on character and motion scenes. I like his style of drawing.
Here is the link: https://www.youtube.com/watch?v=vmPvjZKBNYY
2.) You can tell that most of the animations are drawings, especially when there is a close up or when the character is moving, and the animator made that style of animation look very well, and it fit the overall story well.
3.) The story was about a struggling man fighting his inner demons and other people, it all takes place in parts of a city and the mans mind.
4.) I would consider animating in that sam style he did, to get that drawing-look.
5.) I've already learned about character and story development.
6.) He drew the scene's and characters well and also had very good running/walking scenes.
7.) There could be better voice acting as at some points it didn't sound very good.
8.) The animator did very well on character and motion scenes. I like his style of drawing.
Here is the link: https://www.youtube.com/watch?v=vmPvjZKBNYY
Sep 2, 2015
Professional Review (video)
General Opinion
This was a very interesting, fun and entertaining video by Joe Weller.
What did they do well?
They used very good cameras, kept it on a tripod which made it steady. He only used two shots but they captured everything in the video.
What can be improved?
He does take too much time on shots, and that could be cut down to avoid losing viewers attention.
Cyle Kobe
Subscribe to:
Posts (Atom)